
Get help
Product Activation
FAQ’s
Downloads

In this fast-moving era, everyone is willing to have a more comfortable and easy life. To stay connected with loved ones or fellow citizens internet is a must these days. We use the internet for many things like sending a message or maybe for using social media or for some professional meetings. Every time the signal strength isn’t good enough as a result of the use of WIFI has increased recent times. However, sometimes the WIFI coverage in our homes or offices may not reach every corner, leading to dead zones where the internet connection is weak or nonexistent. This is where the WIFI extensions are used.
Certain steps need to be incorporated to have a WIFI extender. They are:
Step 1: Unboxing and Familiarization
Start by unboxing your new Wi-Fi extender and laying out all the components. Typically, you’ll find the extender unit itself, a power adapter, and an Ethernet cable. Take a moment to read through the user manual provided by the manufacturer to familiarize yourself with the device’s features and specifications.
Step 2: Placement
Next, decide on the optimal placement for your Wi-Fi extender. It should be positioned midway between your router and the area where you’re experiencing weak Wi-Fi signals. Avoid placing it too close to electronic devices or thick walls, as this can interfere with the signal strength.
Step 3: Powering On
Connect the power adapter to the Wi-Fi extender and plug it into a power outlet. Wait for the device to power on and initialize, which usually takes a few moments. Once it’s powered on, you should see indicator lights on the extender, indicating its status.
Step 4: Connect to the Extender
On your computer or mobile device, navigate to the list of available Wi-Fi networks. You should see a new network with a name that includes the manufacturer’s brand or model of the extender (e.g., “TP-Link_Extender”). Select this network to connect to the extender.
Step 5: Accessing the Setup Page
Once connected to the extender’s network, open a web browser and type in the default IP address provided in the user manual (e.g., 192.168.0.1 or 192.168.1.1). This will take you to the setup page of the extender, where you can configure its settings.
Step 6: Configuring the Extender
Follow the on-screen instructions to configure the Wi-Fi extender. You’ll likely be prompted to select your existing Wi-Fi network from a list and enter the password. This allows the extender to extend the range of your existing network by creating a secondary network with the same name and password.
Step 7: Connecting Devices
Once the setup is complete, your Wi-Fi extender will restart and begin broadcasting a new extended Wi-Fi network. Return to the list of available Wi-Fi networks on your devices and connect to the new network using the same credentials as your original network. Your devices should now seamlessly switch between the router and extender as needed, ensuring a strong and stable connection throughout your home or office.
Step 8: Security Considerations
Remember to secure your Wi-Fi network by setting a strong password and enabling encryption (WPA2 is recommended) to prevent unauthorized access. Additionally, periodically check for firmware updates for your Wi-Fi extender to ensure optimal performance and security.
In conclusion, setting up your new Wi-Fi extender doesn’t have to be complicated. By following the easy steps outlined in this guide, you can improve your Wi-Fi coverage and say goodbye to dead zones. Remember to find the right spot for your extender, connect it to your existing network, and secure it with a strong password. If you need help along the way, don’t hesitate to refer to the user manual or reach out to customer support. With a little patience and know-how, you’ll soon enjoy a reliable internet connection in every corner of your home or office. So, go ahead and take control of your Wi-Fi today for smoother online experiences tomorrow!
Lastly, in today’s world, a strong Wi-Fi signal is crucial. Wi-Fi extenders help eliminate dead zones. This guide simplifies the setup process. Just follow these steps to enjoy seamless connectivity throughout your space. From unboxing to configuration, we’ve got you covered. Get ready to bid farewell to Wi-Fi frustrations and hello to uninterrupted browsing!
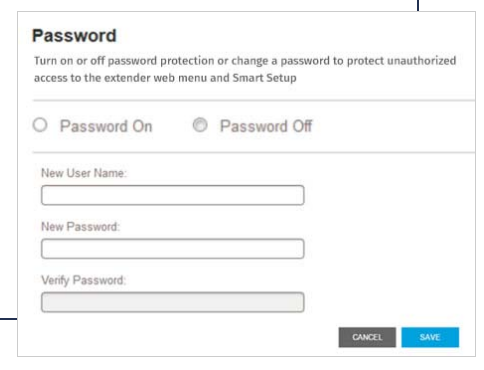
- Pull up an internet browser and go to the http://mywifiext page.
- Input the username and password and click on the Log In button.
- Navigate to the password settings. A window will open with two options namely a new username and a new password.
- Enter the user ID and passphrase into their respective fields.
- Finally, click on the Save button to put the changes into effect.
- Are you tired of Wi-Fi dead zones in your home or office? Say goodbye to frustratingly slow internet speeds and unreliable connections with Wi-Fi Extender! Our powerful Wi-Fi extender is designed to boost your existing network, delivering fast and reliable Wi-Fi coverage to every corner of your space.
Trouble with you Extender
Wi-Fi Extender features advanced technology that extends your Wi-Fi coverage, ensuring that every room in your home or office has a strong and stable connection. Whether you’re streaming movies, gaming online, or video conferencing, Wi-Fi Extender has you covered.
Setting up Wi-Fi Extender is quick and easy. Simply plug it into a power outlet, connect to your existing Wi-Fi network, and you’re ready to go. The intuitive setup wizard will guide you through the process, so you can start enjoying better Wi-Fi in minutes.
With Wi-Fi Extender, you can enjoy blazing-fast Wi-Fi speeds of up to [insert speed], perfect for streaming HD videos, playing online games, and downloading large files. Say goodbye to buffering and lagging – MYWIFIEXT delivers a seamless online experience.
Protect your network and devices with Wi-Fi Extender advanced security features. With support for WPA2 encryption, you can rest assured that your data is safe and secure from unauthorized access.
Wi-Fi Extender is a cost-effective solution to your Wi-Fi woes. Why spend hundreds of dollars on a new router when you can simply extend your existing network with Wi-Fi Extender? Save money without compromising on performance.
At MYWIFIEXT, we are committed to providing our customers with the best possible experience. If you’re not completely satisfied with your purchase, our friendly customer support team is here to help. We offer a [insert warranty period] warranty and a [insert return policy] return policy, so you can buy with confidence.
Don’t let Wi-Fi dead zones slow you down. Upgrade to Wi-Fi Extender Pro today and enjoy fast, reliable Wi-Fi coverage in every corner of your home or office.
Chat With Us
Chat WIth Our Experts and get real time answers to all your queries related to netgear extender .

WWW.MYWIFIEXT.SHOP CREATE ACCOUNT
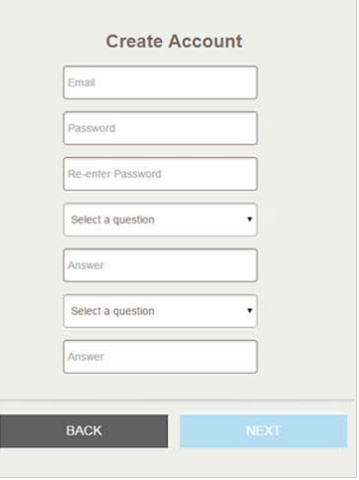
Do I really need to register for an account on www.mywifiext.net? Yes, of course! The prerequisite for logging in and setting up an extension is this.
Access the http://mywifiext website using a web browser to create a mywifiext account. Now click the “Create Account” button on mywifiext.net. Enter all necessary information, then select Next. You can access your account and find many sections, including those listed below, by using the mywifiext login password.
- WAN Setup
- Operating Mode
- Wireless Settings
- USB Settings
Chat with our technical engineer to get your issue resolved

WPS’s primary goal is to protect your home or workplace network. Users can set up their Netgear extenders without an installation CD by using this method. You don’t have to manually enter the login and passcode to connect to a WiFi secured setup. Contact our specialists if you experience any issues when utilising the WPS setup.
A central part of your home or business is the ideal placement for your extension. Make that the extender is situated inside the present WiFi router’s coverage area. Additionally, the device should be set a particular distance away from objects that cause interference, such as cordless phones, microwave ovens, mirrors, refrigerators, glasses, and similar gadgets.
On your computer, open a web browser and go to the mywifiext.net start page. To log in, type your username and password. Go to the area for associated devices and make a note of the name and IP address. Once finished, use this address to log in to your Nighthawk extender. You will now see the Netgear extender login page in its most basic form. Contact our professionals if you experience any difficulties logging into the Nighthawk extender.
The handbook that came with the extension purchase has the default mywifiext login information. Reset your extender to its factory default settings if you have modified the details and lost the passphrase. After that, you can log in to extenders using the standard username and password.
Troubleshoot Common Problems
Can’t access Mywifiext?
- Mywifiext keeps popping up
- Unable to access the extender’s login page
- The www mywifiext net setup wizard not opening
- Can’t find the server
- http://mywifiext-local website can’t be reached
- Can’t get mywifiext local set up success
- Mywifiext setup web page cannot be found
- The page keeps asking for username and password
- Can’t login to the WiFi extender
Mywifiext net Login Issues
- Improper WiFi signal
- Router configuration issues
- Pre-shared key and SSID Issue
- Problems with LAN card
- Corrupted Internet exe file
- Outdated firmware version
- Issues with your web browser
- Intermittent wireless connection
Mywifiext.net Troubleshooting Tips
- Extender must be turned on.
- Use another web browser.
- Try using the default IP address.
- Clear cache and history of your browser.
- Put your extender away from interference.
- Cross-check the entered web address
mywifiext.net smart wizard
- Select your wireless network.
- Click on the Next button.
- Enter mywifiext to connect.
- Click the Next option.
- Register your extender device.
- Finally, click on the Finish button and complete the mywifiext setup.
Looking For Help ?
FAQ's
Many consumers enquire as to why their WiFi extender won’t connect to our technical experts, so they can offer the answer. If you are experiencing the same issue, don’t be concerned. You face the chance of experiencing connectivity issues with your extender since WiFi-causing devices are placed close to your router and extender. To fix the WiFi extender not connecting issue, move your WiFi devices far away from things that emit radio waves, such as Bluetooth speakers, microwave ovens, cellular phones, baby monitors, etc.
Additionally, issues with internet connectivity may arise if your WiFi extender is not correctly linked to the router.
For this, you must double-check the cables connecting the two machines. If any breaks are discovered in the Ethernet cables, get new ones installed right once.
Nulla urna nibh, dictum eget libero vitae, pharetra porttitor metus. Nulla cursus condimentum orci, id egestas nisi viverra in. Duis sit amet elit vestibulum, sodales tortor id, pellentesque urna. Duis consequat tempor libero. Mauris vel erat et lacus rhoncus feugiat.
Firmware updates are offered for enhancing users ‘experience when it comes to enjoying internet. But, sometimes, users are not able to make the most of their extenders after updating firmware on them. If your WiFi extender is causing problems after firmware update, then chances are you have updated the wrong or corrupted firmware version on your WiFi device. To rid yourself of the issue, you need to reset WiFi extender to the default settings and install it again.
My WiFi extender indicates no internet is another frequent problem that has many WiFi extender customers scratching their heads. If your extender is not installed correctly or you are not receiving proper internet from your Internet Service Provider, a problem may arise.
Ping the router to which your WiFi extender is attached to see whether you are receiving internet from your ISP in order to resolve the WiFi extender reports no internet issue. If it is not the cause of the issue, reset your range extender and reinstall it. Get in touch with our technical experts for quick setup of your WiFi extender.
Netgear WiFi extender app is offered by the company to help users setup and manage their extenders in a hassle-free manner. But, it has been witnessed that the Netgear WiFi extender app is creating issues for many users. If you are also bothered by the same, check whether you have installed the latest software version of the app. If not, download the latest version of the Netgear WiFi extender app now only. Still same? Well, in that case, you need to approach our experts. They will diagnose why your Netgear WiFi extender app is creating issues and then fix it for you in a matter of minutes.
No one likes to use the internet with lag. This is why another frequently asked question that our team of experts handles every day is – why is my wifi extender so slow.